Once you have purchased your dedicated server, you will have to learn how to access it.
It is easily available in two ways.
First, you can connect to your server using a Control Panel software solution, if such is installed on your machine.
In case, however, that you have not purchased a Control Panel solution because you simply do not need one,
you can always connect to the server using SSH.
It is an advanced, secure telnet solution, which provides a tunnel connection between two dedicated machines
from the same different networks.
Download the PuTTY executable file. Once you have downloaded it, you will not need to install it, as it is a standalone product.
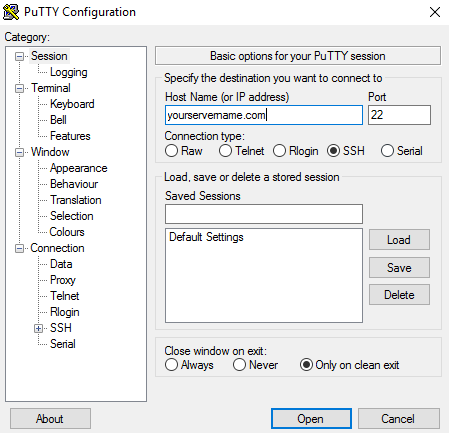
Start the program. You will see that you can specify the destination you want to connect to from the Host Name (or IP Address) field. Type in either the host name (yourservername.com, for example) or the IP Address of the server in order to connect to it. The default SSH port is 22, unless you have changed it to be otherwise. Leave the SSH protocol checked and click on 'Open'.
You will be prompted for a username and a password.
Type in root and the password you have set up for your Server.
Once your user/password are accepted, you will successfully connect to the server.
A free version of SSH, called OpenSSH, is available as the ssh package in Debian. Assuming that you already have installed OpenSSH, just open a Terminal and type in
You can also use OpenSSH with Mac and open up Terminal to write the command same as the Linux one. However, if you'd like to open multiple SSH screens at once and do not want to keep typing your password all the time, you can go for an SSH client such as RBrowser.
 For Windows
Download the PuTTY executable file. Once you have downloaded it, you will not need to install it, as it is a standalone product.
Start the program. You will see that you can specify the destination you want to connect to from the Host Name (or IP Address) field. Type in either the host name (yourservername.com, for example) or the IP Address of the server in order to connect to it. The default SSH port is 22, unless you have changed it to be otherwise. Leave the SSH protocol checked and click on 'Open'.
 For Linux
A free version of SSH, called OpenSSH, is available as the ssh package in Debian. Assuming that you already have installed OpenSSH, just open a Terminal and type in
ssh username@yourservername.com
or
ssh username@ipaddress
You will be prompted to add the IP Address/Hostname to the allowed and known hosts list.
Type in yes and continue by typing in your password.
 For Mac
You can also use OpenSSH with Mac and open up Terminal to write the command same as the Linux one. However, if you'd like to open multiple SSH screens at once and do not want to keep typing your password all the time, you can go for an SSH client such as RBrowser.